
The fastest way to learn custom trackers is to copy what Blitapp’s built-in trackers do. Each one is just a selector plus a JavaScript expression – both small enough to test in your browser before you ever save the tracker. This walkthrough takes you from the simplest built-in tracker (Page Title) to the most involved (Google Search Rank, which uses <input> to thread a target URL through the selector and value expression), with the DevTools steps to validate every example.
If you haven’t created a custom tracker before, the Create Your Own Custom Trackers post covers the form fields. This one is hands-on.
Blitapp evaluates your Value expression in the page exactly the way the browser console does. So if a one-liner returns the right value in DevTools, it will return the same value when the capture runs. If it throws there, it will throw at capture time too – and you’ll see null in your tracker history.
The workflow is the same for every tracker:
If the value matches what you want stored, you’re done – copy the same expression into the tracker form.
Built-in Page Title just reads document.title. There’s no selector, no input – the value is always available the moment the page loads.
In DevTools console:
document.title
Tracker form:
Page Titledocument.titlestringUse this as a sanity check the first time you set up trackers: pick any URL, save the tracker, run the capture, and confirm the title shows up in your tracker history.
The built-in Amazon Price tracker grabs the headline price from any Amazon product page. The price lives inside a span.a-price. There can be several of them on the page, so the tracker takes the first one.
Test in DevTools on a product URL like https://www.amazon.com/dp/B08N5WRWNW:
document.querySelectorAll('span.a-price > .a-offscreen')\[0\].textContent
Tracker form:
Amazon Pricespan.a-price – Blitapp waits for this element before running the value expressiondocument.querySelectorAll('span.a-price > .a-offscreen')\[0\].textContentstringTwo things to note:
null.textContent includes accessibility text, so the result looks like "$49.99". That’s fine for a string tracker. If you want a number-only chart, change the Value type to number.YouTube’s DOM has changed over the years and the views counter has lived under two different selectors. The built-in tracker handles both with a comma-separated CSS selector list:
document.querySelectorAll('#formatted-snippet-text > span:nth-child(1), span.view-count')\[0\].textContentOpen any video page and try that in the console. Whichever variant the page is using, querySelectorAll returns the matching nodes from either selector and \[0\] picks the first one.
Tracker form:
YouTube ViewsnumberThis is the trick to use any time a site is mid-redesign or you’re not sure which class names will be live. List both. The first one that exists wins.
When class names change on every deploy, attribute selectors are more durable. The built-in Twitter Likes tracker keys off the href of the link to the likes page rather than any class name:
document.querySelectorAll("a\[href$='/likes'\]")\[0\].textContenta\[href$='/likes'\] reads as “an <a> whose href ends with /likes“. On a tweet page, that’s the link that takes you to the list of users who liked the tweet – and it conveniently displays the count.
Other useful attribute matchers when you write your own:
\[href\*='/foo'\] – href contains /foo\[href^='https://'\] – href starts with https://\[data-testid='like-button'\] – exact attribute match (very common on apps that use data-testid)Tracker form:
Twitter Likesnumber<input> (the most complex)The built-in Google Search Rank tracker tells you where a given URL lands on a Google search results page. It’s the trickiest of the bunch because it does three things at once:
<h3> blocks are the organic ones (Google peppers the page with featured snippets, sitelinks, “people also ask”, etc. – only organic results count toward rank).The full value expression:
(function(){
 var className = document.querySelectorAll("a\[href\*='<input>'\] > h3")\[0\].getAttribute('class').split(' ').join('.');
 var page = Array.from(document.querySelectorAll('td > span')).filter(x => x.parentNode.textContent != '').map(x => x.parentNode.textContent)\[0\] \|\| 1;
 return Array.from(document.querySelectorAll(\`a > h3.${className}\`))
 .filter(function(x){ return x.offsetParent != null })
 .findIndex(function(x){ return x.parentNode.href.includes('<input>') }) + 1 + (page - 1) \* 10;
})()
Three new pieces compared to the earlier examples:
<input> in two places. Earlier examples used <input> only once. Here it shows up in the Selector field (a\[href\*='<input>'\], so Blitapp waits for at least one matching link to appear) and twice inside the value expression. Blitapp substitutes every occurrence with the per-capture input before running the expression.<h3>s share an auto-generated class name (something like LC20lb) that the featured snippets and sidebar widgets don’t have. The first line grabs that class off the result whose href matches your input, then uses it to filter to organic results only on the next line.(function(){ ... })()) chains those steps together – declare a class, find the page number, find the index, do the math – and returns one number, which is what gets stored.The math at the end – findIndex(...) + 1 + (page - 1) \* 10 – turns a 0-based index on the current results page into a 1-based global rank, on the assumption that Google shows ten results per page.
Because Blitapp does the substitution server-side, you can’t paste this expression directly into your console while <input> is still there. To test:
screenshot api and check where blitapp.com ranks.<input> in the expression with blitapp.com.So the testable version is:
(function(){
 var className = document.querySelectorAll("a\[href\*='blitapp.com'\] > h3")\[0\].getAttribute('class').split(' ').join('.');
 var page = Array.from(document.querySelectorAll('td > span')).filter(x => x.parentNode.textContent != '').map(x => x.parentNode.textContent)\[0\] \|\| 1;
 return Array.from(document.querySelectorAll(\`a > h3.${className}\`))
 .filter(function(x){ return x.offsetParent != null })
 .findIndex(function(x){ return x.parentNode.href.includes('blitapp.com') }) + 1 + (page - 1) \* 10;
})()
If you’re on page 1 and blitapp.com is the third organic result, that returns 3. If you’re on page 2 and it’s the second result, that returns 12. A return of 0 means the input URL wasn’t found on the current page – which is also useful information to chart over time.

Tracker form:
Google Search RankURL or part of URLa\[href\*='<input>'\] – so Blitapp waits for at least one matching result link before evaluating<input> left in place)numberWhen you add this tracker to a capture for a Google search URL, Blitapp prompts you for the URL or fragment you want to track. The same tracker can power as many search-rank checks as you have searches scheduled – one capture per search term, each with its own input.
$0 is your friend. Click any element in the Elements panel, then type $0 in the console – it’s a reference to the selected node. Great for quickly checking what textContent or getAttribute('href') returns without writing a selector.

Right-click an element → Copy → Copy selector gets you a working selector in one step. It’s often noisy (e.g. #main > div:nth-child(3) > ...); shorten it before saving.
Test under the same conditions Blitapp uses. Captures default to a desktop viewport with no logged-in session. If a value only appears when logged in, your capture needs to log in first.
Watch for elements rendered late. If document.querySelectorAll(...) returns nothing in DevTools right after the page loads but works after a couple of seconds, set the Selector field on the tracker so Blitapp waits for it. Otherwise the value expression evaluates too early and stores null.
Keep expressions defensive. document.querySelectorAll('.foo')\[0\]?.textContent \|\| '' returns an empty string when the element is missing, which is much easier to spot in tracker history than a thrown error.
You can copy any of the examples above as a starting point and tweak the selector or expression. The full list of built-in trackers (Amazon Search Rank, Google Search Rank, YouTube Likes/Comments, Twitter Retweets/Quote Tweets, and more) lives in the tracker dropdown when you edit a capture – they’re all written in the same JavaScript-in-the-page style as the examples here, so peeking at one in your captures is often the quickest path to writing your own.
Happy tracking.
Create Your Own Custom Trackershttps://blitapp.com/blog/create-your-own-custom-trackers/ Sat, 25 Apr 2026 05:00:00 -0700https://blitapp.com/blog/create-your-own-custom-trackers/You can now define your own trackers in Blitapp and use them in any capture – no support request needed. Custom trackers are shared with everyone on your team automatically.
A tracker extracts a value from a page when a capture runs and stores it in your history. You can see how the value changes over time on the Trackers history page. Blitapp already ships with built-in trackers for Amazon, Google search rank, YouTube, X (Twitter), and more. Blitapp can create chart for these trackers.
Until today, adding a tracker for a page Blitapp didn’t support meant contacting us. Now you can create one yourself in a minute.
string or number. Numeric values are plotted on the history chart.<input> in your selector or value expression.
Say you want to track the headline price on a product page that displays it inside <span class="product-price">$49.99</span>:
my\_product\_priceMy Product Pricespan.product-pricedocument.querySelector('span.product-price').textContentnumberThe value expression strips the currency symbol so the result is a clean number that can be charted.
If the same tracker should work across many pages and needs a parameter – say the CSS selector to pull the value from – check Requires input and use <input> as a placeholder:
document.querySelector('<input>').textContent.trim()Element selectorWhen you add this tracker to a capture, you’ll be prompted to enter the selector for that particular URL.
Open or create a capture. The tracker dropdown now has two groups:
Your new tracker shows up in the second group. Select it, supply an input if required, and save. From the next run onward, your tracker runs on every capture and its value appears in the Trackers history page.
Custom trackers are team-wide by default – every team member sees them in the picker and can use them. Only the creator can edit or delete a tracker. Teammates with the ModifyAll role can edit or delete trackers created by others (useful for team admins maintaining a shared library).
You can manage roles from the Team page.
css-1a2b3c) change between deploys. Look for data- attributes, semantic tags, or ARIA labels instead.Happy tracking.
Blitapp Is Migrating to ScreenshotCenter for Faster, More Reliable Screenshotshttps://blitapp.com/blog/blitapp-is-migrating-to-screenshotcenter-for-faster-more-reliable-screenshots/ Sat, 04 Apr 2026 11:00:00 -0700https://blitapp.com/blog/blitapp-is-migrating-to-screenshotcenter-for-faster-more-reliable-screenshots/We’re upgrading the engine behind Blitapp. Over the coming weeks, we’ll be migrating our screenshot backend from Browshot to ScreenshotCenter – a modern screenshot API built for speed and reliability.

Since day one, Blitapp has relied on the Browshot API to capture web pages. Browshot has served us well, but ScreenshotCenter gives us access to a newer, faster infrastructure that will directly benefit every Blitapp user.
The migration will happen gradually over multiple weeks. We’re rolling it out account by account to ensure a smooth transition. You don’t need to change anything on your end – your captures, schedules, apps, and settings will continue to work exactly as before.
ScreenshotCenter’s infrastructure delivers screenshots faster. Pages that previously took a long time to render will complete more quickly, which means your captures arrive sooner.
Fewer failed captures and retries. ScreenshotCenter is built on modern cloud infrastructure with better availability and redundancy.
Blitapp has always supported Chrome, but Firefox support was limited to an older version. With ScreenshotCenter, you’ll get full support for the latest version of Firefox, giving you more accurate renders for sites that behave differently across browsers.
The migration to ScreenshotCenter also opens the door to features that weren’t possible with our previous backend:
ScreenshotCenter supports screenshots from a wider range of countries, which means we’ll be able to offer more geographic options for captures that need to be taken from specific locations.
ScreenshotCenter’s ad and popup blocking is more effective at removing cookie banners, interstitials, and intrusive ads. We plan to bring these improvements to Blitapp so your captures are cleaner out of the box.
One of the most exciting upcoming features is video generation. Instead of a static screenshot, you’ll be able to record a video of a page loading, scrolling, or interacting with automation steps. This is great for monitoring animations, carousels, or any dynamic content.
Capture entire pages as PDF documents – useful for archiving, compliance, or sharing web content in a print-friendly format.
Capture pages as they appear on a wider range of mobile and tablet devices, with accurate viewport sizes and device emulation.
If you’re curious about the technical differences, ScreenshotCenter has published a detailed comparison between their API and other screenshot services, including Blitapp’s current Browshot backend.
The migration is already underway. We’re rolling it out gradually:
You’ll continue to use Blitapp exactly as you do today. The only differences you should notice are faster and more reliable captures.
If you have any questions about the migration, reach out to us at support@blitapp.com. We’re happy to help.
Schedule Captures on the Last Day of the Monthhttps://blitapp.com/blog/schedule-captures-on-the-last-day-of-the-month/ Sat, 04 Apr 2026 05:00:00 -0700https://blitapp.com/blog/schedule-captures-on-the-last-day-of-the-month/You can now schedule captures to run on the last day of every month – regardless of whether that’s the 28th, 29th, 30th, or 31st.
Until now, if you wanted to capture a page on the last day of every month, you had to pick a specific day like the 28th or 31st. Picking the 31st meant your capture wouldn’t run in February, April, June, September, or November. Picking the 28th meant you’d miss the actual last day in most months.
When you edit a capture’s schedule, you’ll now see a Last button alongside the 1-31 day buttons.

Selecting Last tells Blitapp to run the capture on the final day of each month:
You can combine Last with other days. For example, selecting 1 and Last will capture on both the first and last day of every month.
Capture dashboards, analytics pages, or financial summaries on the last day of each month for your records.
Take a snapshot of a web page at the end of every month to track how it changes over time.
Capture invoice portals or billing dashboards right before the month rolls over.
Automatically archive the state of a regulated web page at month-end for compliance documentation.
That’s it. Your capture will automatically adjust for short months and leap years.
Dynamic URLs: Use Variables in Your Capture URLshttps://blitapp.com/blog/dynamic-urls-use-variables-in-your-capture-urls/ Fri, 03 Apr 2026 23:00:00 -0700https://blitapp.com/blog/dynamic-urls-use-variables-in-your-capture-urls/You can now use date and time variables directly in your capture URLs. This lets you schedule captures of pages where the URL changes every day, hour, or minute – without creating a new capture each time.
When you create or edit a capture, you can include variables in the URL wrapped in angle brackets. At capture time, Blitapp replaces them with the current date and time in your timezone.
Available variables:
| Variable | Description | Example output |
|---|---|---|
<year> |
4-digit year | 2026 |
<month> |
2-digit month | 04 |
<day> |
2-digit day | 15 |
<hour> |
2-digit hour (24h) | 14 |
<minute> |
2-digit minute | 30 |
All date and time values use your account timezone, so a capture scheduled at 11pm in Los Angeles on April 2nd will use April 2nd, not April 3rd UTC.
Many webcomic sites use the date in their URL. Instead of manually updating the URL every day, set it once:
https://comicskingdom.com/popeye/<year>-<month>-<day>Today this captures https://comicskingdom.com/popeye/2026-04-04. Tomorrow it automatically becomes https://comicskingdom.com/popeye/2026-04-05.
Capture a daily report or archive page that rotates by date:
https://www.example.com/reports/<year>/<month>/<day>/summaryMany financial sites organize data by date:
https://finance.example.com/market-close/<year>-<month>-<day>If a site aggressively caches and you want to force a fresh load, add a random parameter:
https://www.example.com/dashboard?nocache=<timestamp>For pages that update throughout the day with time-based URLs:
https://status.example.com/hourly/<year>-<month>-<day>-<hour>If you use Apps to upload your screenshots to cloud storage, you are probably already familiar with variables. Apps support variables in folder and file names to organize your captures automatically:
<year>, <month>, <day>, <hour>, <minute> for date-based folders<domain>, <path>, <url> for URL-based names<capture\_name>, <browser>, <country> for capture metadata<tags> for tag-based organizationFor example, you could capture a daily comic page using URL variables:
URL: https://comicskingdom.com/popeye/<year>-<month>-<day>And save it to your S3 bucket or Google Drive with app path variables:
Folder: comics/<year>/<month>
File: popeye-<year>-<month>-<day>.png
This gives you a fully automated pipeline: the right page is captured every day and stored in a neatly organized folder structure – all without any manual intervention.
Variables work with single URLs, multiple URLs, and alongside all other capture settings like automation steps, login, and custom headers.
Log Website Data to a Google Spreadsheet Automaticallyhttps://blitapp.com/blog/log-website-data-to-a-google-spreadsheet-automatically/ Sat, 21 Mar 2026 05:00:00 -0700https://blitapp.com/blog/log-website-data-to-a-google-spreadsheet-automatically/Want to track Amazon prices, monitor search rankings, or record weather data over time — all in a spreadsheet that updates itself? With the new Google Spreadsheet App, Blitapp can append a row of data to your Google Sheet every time a capture runs.
Many websites display information that changes throughout the day: product prices, stock levels, search positions, weather conditions, review counts. If you need a historical record of these values, manually copying them into a spreadsheet is tedious and easy to forget.
With Blitapp, you set it up once. Every time your scheduled capture runs — whether that’s twice a day or every hour — a new row is added to your spreadsheet with the timestamp, the page URL, and whatever data points you’re tracking.
Here are a few things you can build:
Blitapp trackers extract specific data points from a web page — a price, a number, a piece of text. The Google Spreadsheet App takes those tracker values and writes them into matching columns in your sheet.
The matching is automatic: if your spreadsheet has a column called “Temperature” and your capture uses a tracker named “Temperature”, the value lands in the right column. No manual mapping or configuration needed.
Built-in columns are also available:
Create a Google Sheet and add column headers in the first row. Use the built-in column names and tracker names that match your capture. Here is an example for tracking an Amazon product:
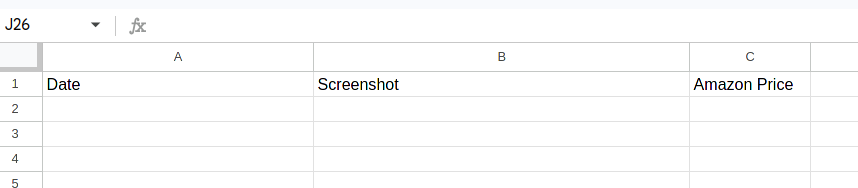
The “Amazon Price” column matches the tracker assigned to the capture. You can add as many tracker columns as you need.
Grant Editor access to browshot-google-spreadsheets@spreadsheet-302000.iam.gserviceaccount.com so Blitapp can write to your sheet.
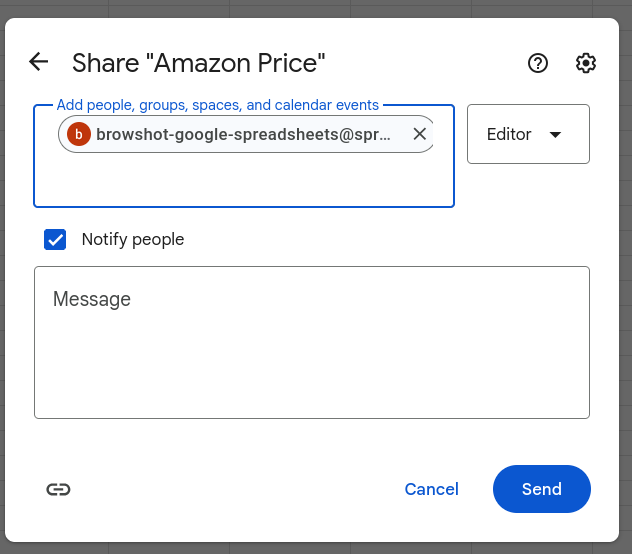
Go to Apps, select Google Spreadsheet, paste the spreadsheet URL, and click Verify to confirm access.

Add the Google Spreadsheet App and the relevant trackers to your capture. Set a schedule — every hour, twice a day, whatever fits your use case.
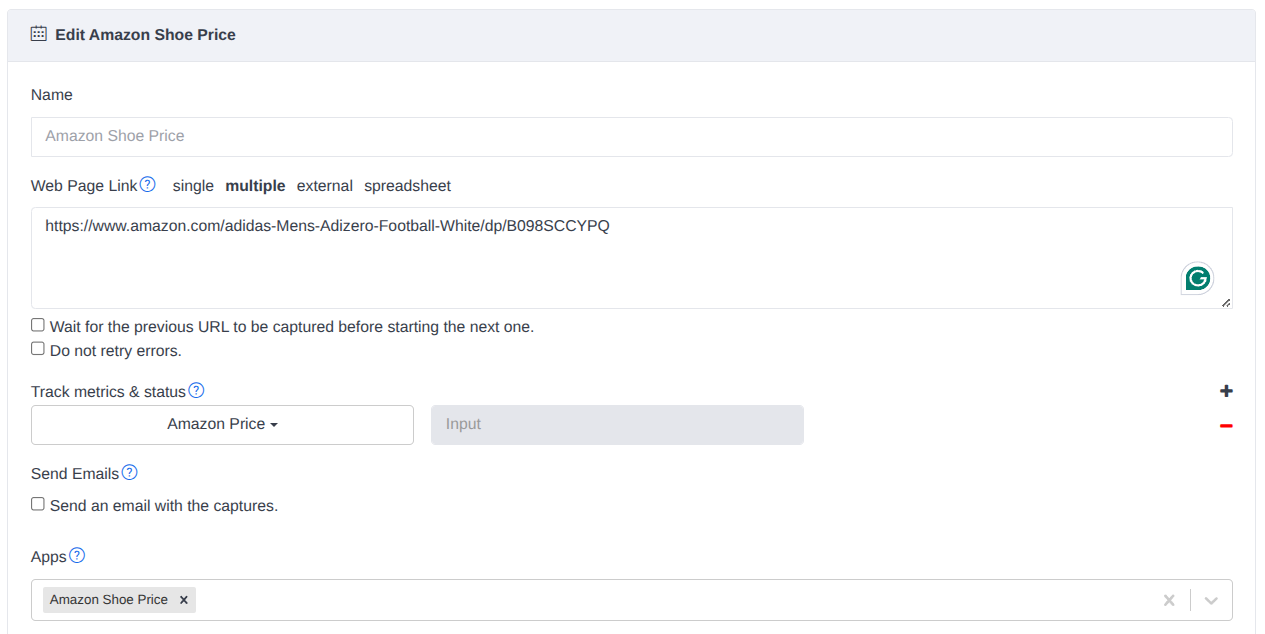
Hit Save & Test to run it immediately. You’ll see the tracker data in your capture history:

And your spreadsheet now has a new row with all the data:

Every time the capture runs, another row is appended. Over days and weeks, you build a complete dataset — ready to chart, analyze, or export.
Sign up for a free trial and try it out. If you need a custom tracker for a specific page, reach out to us at support@blitapp.com — we’re happy to help.
For the full technical details, see the Google Spreadsheet App support page. To learn more about trackers, check out the tracker documentation.
Introducing the Blitapp Affiliate Program – Earn 30% for 12 Monthshttps://blitapp.com/blog/introducing-the-blitapp-affiliate-program-earn-30-for-12-months/ Sat, 28 Feb 2026 01:00:00 -0800https://blitapp.com/blog/introducing-the-blitapp-affiliate-program-earn-30-for-12-months/We’re excited to announce the launch of the Blitapp Affiliate Program. Refer customers to Blitapp and earn a 30% recurring commission on every payment they make — for a full 12 months.
Signing up is free and takes less than a minute. Once you’re in, you get a unique referral link to share wherever your audience is — your blog, newsletter, YouTube channel, social media, or anywhere else.
When someone visits Blitapp through your link and subscribes to a paid plan, you earn 30% of every payment they make for the next 12 months. That means if they’re on the $30/month plan, you earn $9 every single month, automatically.
The affiliate program is a great fit for anyone who writes about or works with:
Blitapp plans range from $5 to $200 per month. With 30% commission for 12 months, a single referral on the $50/month plan earns you $180 over the course of the year.
| Plan | Monthly Commission | 12-Month Earnings |
|---|---|---|
| $5/month | $1.50 | $18 |
| $10/month | $3.00 | $36 |
| $30/month | $9.00 | $108 |
| $50/month | $15.00 | $180 |
| $100/month | $30.00 | $360 |
| $200/month | $60.00 | $720 |
Ready to start earning? Head over to affiliates.blitapp.com to create your free affiliate account and get your referral link.
If you have any questions about the program, feel free to reach out at support@blitapp.com.
Your Screenshot Quota Now Matches Your Billing Cyclehttps://blitapp.com/blog/your-screenshot-quota-now-matches-your-billing-cycle/ Tue, 17 Feb 2026 22:00:00 -0800https://blitapp.com/blog/your-screenshot-quota-now-matches-your-billing-cycle/Starting in March, your monthly screenshot quota will reset on your billing date instead of the 1st of the month. This means your quota period and your payment period are now perfectly aligned.
Until now, every Blitapp user’s screenshot quota reset on the 1st of each calendar month, regardless of when their subscription started. If your billing date was the 15th, you were paying for one period but your quota was counting on a different one.
Going forward, your quota resets on the same day you’re billed each month. If you subscribed on the 15th, your screenshot count resets on the 15th. If you subscribed on the 3rd, it resets on the 3rd.
Because of how the switch works, you’ll get extra screenshots during the transition. Your quota will reset one final time on March 1st as usual, and then reset again on your billing date. That means a few bonus days of fresh quota. Consider it a small thank-you for being a Blitapp user.
No. The change happens automatically. You’ll see your screenshot count reset on your billing date going forward. Everything else stays the same — your plan, your captures, your integrations, and your billing amount are all unchanged.
We heard from users who found it confusing that their quota and billing periods didn’t line up. This change makes things simpler and fairer: the screenshots you pay for each month are now counted from the day you’re actually billed.
If you have any questions, reach out to us at support@blitapp.com.
Drag and Drop for Automation Stepshttps://blitapp.com/blog/drag-and-drop-for-automation-steps/ Sun, 15 Feb 2026 05:35:00 -0800https://blitapp.com/blog/drag-and-drop-for-automation-steps/We just added drag-and-drop support for Automation Steps and Initial Automation Steps.
You can now reorder your steps directly in the editor, without deleting and recreating them.
Automation workflows often evolve. You might need to:
sleep step before a click.navigate step earlier in the sequencescreenshot step after a specific interactionfor / end)With drag-and-drop, making these changes is much faster and less likely to cause mistakes.

Automation Steps let Blitapp work with pages before and during captures. You can:
click page elementstype text into inputsnavigate to other URLssleep to wait for content to loadjavascriptscreenshot capturesfor and endInitial Automation Steps run once before any URLs are captured. Regular Automation Steps run for each capture URL.
If you’d like to see practical examples, check out these posts:
If you ever need help building a complex flow, just reach out to us at support@blitapp.com.
Blitapp Platform Update: Codebase Modernization and Bug Fixeshttps://blitapp.com/blog/blitapp-platform-update-codebase-modernization-and-bug-fixes/ Sat, 14 Feb 2026 22:30:00 -0800https://blitapp.com/blog/blitapp-platform-update-codebase-modernization-and-bug-fixes/We completed a major modernization of the Blitapp codebase and resolved a broad set of long-standing bugs. This work improves reliability today and gives us a much faster path for shipping improvements going forward.
We overhauled key parts of the application’s codebase:
This wasn’t just cosmetic—our goal was to make everyday product work safer, faster, and easier to maintain.
Along with these upgrades, we fixed several bugs that affected reliability and predictability in production.
The fixes focused on:
These changes create immediate and long-term benefits for Blitapp users:
With a cleaner, more modern foundation, we can move more quickly on upcoming projects and reduce the risk of issues resurfacing. You’ll see faster progress on capture features, integrations, and overall product quality.
We appreciate your feedback and support as we continue improving Blitapp.
Manage your captures from a Google spreadsheethttps://blitapp.com/blog/manage-your-captures-from-a-google-spreadsheet/ Tue, 13 Jun 2023 06:12:03 -0700https://blitapp.com/blog/manage-your-captures-from-a-google-spreadsheet/
We’ve added a new way to manage your list of URLs. You can now list all your URLs to capture in a Google spreadsheet. Share the document with Blitapp, and we will check for new URLs at your schedule. Blitapp will pick up new URLs added or refresh existing ones.
You can find all the information to set up your Google Spreadsheet on this support page.

The setup is flexible. You can choose to give Blitapp read-only access or write access if you want the link to the image or the App added to your spreadsheet. All regular features of Blitapp are supported: Advanced Web Page Options, trackers, Apps, etc.


Creating a visual backup of your website is an essential step in ensuring the safety and security of your online presence. Whether you’re running a small blog or a large website, or selling on a platform like Amazon or Spotify, having a backup of your site can save you a lot of headaches and lost revenue in the event of a disaster or hack.
One of the most effective ways to create a visual backup of your website is through website screenshots. This process involves taking screenshots of every page on your site so that you can visualize what your site looks like at a particular moment in time. These screenshots can then be stored in a safe location, such as your one server (FTP server or other) or cloud storage service (Google Drive, Dropbox, Microsoft OneDrive, etc.) so that you can easily access them if needed.
One of the main benefits of creating a visual backup of your website is that it allows you to quickly and easily restore your site to a previous state. This can be especially useful if your site is hacked or if you accidentally make changes that negatively impact your site’s layout. With a visual backup, you can simply restore the images to their previous state, and your site will be back up and running in no time.
Another benefit of creating a visual backup of your website is that it can help you track changes over time. By regularly taking screenshots of your site, you can see how your site has evolved and make decisions about future changes based on that information. This can be especially useful for businesses constantly updating their site with new products or services.
Creating a visual backup of your website is a relatively simple process with Blitapp that can considerably impact the safety and security of your online presence. By regularly taking screenshots of your site and storing them in a safe location, you can ensure that you’re always prepared in case of a disaster or hack. So if you haven’t already, create a visual backup of your website today!
Blitapp is free for 14 days - no credit card is required. Set up a full visual backup of your website in just a few clicks.
Check out our YouTube channelhttps://blitapp.com/blog/check-out-our-youtube-channel/ Sat, 07 Jan 2023 05:12:03 -0800https://blitapp.com/blog/check-out-our-youtube-channel/
We have created a YouTube channel for Blitapp with videos that go over the main features:
These videos are also available in the help pane inside the UI, on our Support pages, and Blog. I hope you enjoy the content!
You can find the 6 videos currently available here:
Happy New Year! Blitapp in 2022https://blitapp.com/blog/happy-new-year-blitapp-in-2022/ Tue, 27 Dec 2022 04:12:03 -0800https://blitapp.com/blog/happy-new-year-blitapp-in-2022/
Happy New Year!
We want to thank all our users for 2022 and wish everybody a great year ahead!
We have delivered a lot of new features and improvements in 2022:
The other focus has been on making it easier to understand all the advanced features we offer:
We’ll keep working on documentation and guides in 2023.
Under the hood, we’ve increased our growth in 2022:
Stay tuned for an even better Blitapp in 2023!
Capture all elements of a carouselhttps://blitapp.com/blog/capture-all-elements-of-a-carousel/ Mon, 19 Dec 2022 11:12:03 -0800https://blitapp.com/blog/capture-all-elements-of-a-carousel/With the automation steps, we support rich interactions with a web page. Many users want to capture all the elements of a carousel. This post will show you how to do so.
We’ll use a simple carousel found on this page. It has 3 images that can be shown by clicking on the dot at the bottom.

To interact with the dots, we need to find the CSS selector. Press F12 to open the Developer Tools. In the Developer Tools, click on the mouse cursor at the top left corner (highlighted in red below).

Then, move your mouse to the first dot. The HTML code corresponding to the button is now highlighted in the Developers Tools. Right-click on it and choose Copy > Copy selector:

If you paste the value into a text editor, you get the following:
body > div > div > div > div.owl-dots > button:nth-child(1)
This is the CSS selector that identifies the first dot. The CSS selector for the second and third dots are:
body > div > div > div > div.owl-dots > button:nth-child(2)
body > div > div > div > div.owl-dots > button:nth-child(3)
We can simplify these CSS collectors to just:
div.owl-dots > button:nth-child(1)
div.owl-dots > button:nth-child(2)
div.owl-dots > button:nth-child(3)
Let’s create a new capture, use https://preview.colorlib.com/theme/bootstrap/carousel-17 for the URL.
For each dot, we want to do the following:
For the 3 dots, this would be 9 steps. If the number of dots changes over time, we must keep updating the automation steps.
The best way to minimize the number of steps to enter and not to worry about the number of dots to click on is to use a for loop:
for <N> 1..10
click div.owl-dots > button:nth-child(<N>)
sleep 2
screenshot
end
The first step (for) defines a variable <N> that goes from 1 to 10. The variable <N> is used in the CSS selector. Each time the loop runs, the browser clicks on a dot, waits for 2 seconds, and takes a screenshot.
This loop will run up to 10 times. But it will stop the first time the element is not found (div.owl-dots > button:nth-child(4)). So there will be 3 screenshots generated every time this capture runs.
To simplify the for loop, <N> is the default variable when not mentioned, and the values are 1 to 100 (1..100) by default:
for
click div.owl-dots > button:nth-child(<N>)
sleep 2
screenshot
end
If the page has multiple carousels, you can add the same steps for each of them.
Don’t hesitate to contact us if you need assistance with the automation steps.
Share your Blitapp account with your teamhttps://blitapp.com/blog/share-your-blitapp-account-with-your-team/ Sun, 11 Dec 2022 05:12:03 -0800https://blitapp.com/blog/share-your-blitapp-account-with-your-team/
You can share your Blitapp account with multiple team members. Each user can different level of access: view-only, billing, create their captures and apps, etc. Manage your Team in Blitapp. Invite new team members today.
Go to Team and invite members. You can attribute different roles to users, such as managing the subscription and payments (Blitapp), viewing capture history only (View), creating their own captures and apps (Write), or full access to the account (WriteAll). The details of each role can be found on this Support page.
New team members will receive an invitation to log in to the account you created:

The Admin of the Team can update the team members’ roles at any time and remove users from the Team.

You can give View-only or Read-only access to users to access the capture history. These users will also be able to see the definitions of all captures and apps, but they cannot change them.

The Create role allows users to create, update and delete their captures and apps. Each capture schedule uses the timezone of the owner. The timezone is now displayed with each capture.

The Create role does not allow users to update or delete captures or apps created by users. To do so, the Modify All role is required.
When a user is removed from the Team, all their captures and apps are moved to the Team.
You can delegate the subscription management to the IT or Finance department with the Billing role. This allows a user to upgrade, downgrade or cancel a plan, set the billing details and download the invoices, and update the credit card on file. There can be multiple users with the Billing role.
Take advantage of Teams today. You can find more technical details on our Support page.
Track your Amazon product rank, Google search rank, YouTube views, Retweets, and morehttps://blitapp.com/blog/track-your-amazon-product-rank-google-search-rank-youtube-views-retweets-and-more/ Tue, 18 Oct 2022 10:12:53 -0700https://blitapp.com/blog/track-your-amazon-product-rank-google-search-rank-youtube-views-retweets-and-more/
We have added the ability to track metrics, such as your Amazon product rank, Google search rank, YouTube likes and comments, and more. Blitapp can show you the metrics in your history, and the new page shows the trends over time.
Today, we offer the following trackers:
We will add more trackers as we get requests from our users. We also support private and custom trackers that can be added on demand.
You can now get your screenshots uploaded directly to your cloud storage through Apps, including your own Microsoft OneDrive account.
You will find a new option under the list of URLs: select one or multiple trackers to add.
For example, here are two trackers that check the rank of two websites (blitapp.com and browshot.com) for three Google searches:

You can add automation steps to check multiple Google results pages:

For Amazon, you can check the rank of one or multiple products in Amazon categories or any Amazons search:

We can add trackers for prices, status, etc.
When found, the metrics are reported in your history:

You can track multiple metrics for multiple URLs in one capture. Blitapp will automatically retrieve and show the relevant information. In this example, Blitapp retrieved the video’s name and the metric type (Comments, Likes, and Views).
There is a new tab in the history to visualize the metrics as graphs.

You can see all your trackers for the last 30 days by capture. Select one, and you can see a graph of the different metrics:

Click on any data point to get the corresponding screenshot:

You can merge the multiple graphs to compare them. For example, you can compare the rank of a website for various searches:

For each metric, you have a proof in the form of a screenshot. We also offer custom apps, for example, to produce a dashboard that can be shared within a company or with your customers.
This feature is still in beta. Please report any bugs or improvements you’d like to see. Eventually, we will add several trackers as part of each plan.
Upload your screenshots to Microsoft OneDrivehttps://blitapp.com/blog/upload-your-screenshots-to-microsoft-onedrive/ Fri, 14 Oct 2022 10:12:03 -0700https://blitapp.com/blog/upload-your-screenshots-to-microsoft-onedrive/
You can now get your screenshots uploaded directly to your cloud storage through Apps, including your own Microsoft OneDrive account.
To start getting your captures uploaded to your OneDrive account, follow these steps:
We have created an App for OneDrive that lets us upload screenshots into your account. The first step is to authorize this App to access your account.
The left menu has a new entry for Apps. There, you will see all the Apps that you create. Click on Add an App.
Choose Microsoft Dropbox as the type.
Under OneDrive Authorization, you will see a link to Authorize the Blitapp OneDrive App. Click on it.

You will be redirected to OneDrive to authorize our App, then back to the App creation page.
Once the Blitapp App has been authorized, you can create multiple OneDrive Apps with different folders and file names.
Now that the Blitapp App has been authorized, you can finish configuring your App on Blitapp.com.
Choose a custom name that will be used to reference the App when creating or editing captures. You can enter the custom folder and file name used for each image. We support several variables to create dynamic paths. See our previous post for more details.
Before you save the App, click on Verify to ensure it is configured correctly. Blitapp will attempt to upload the file blit.png to the folder you specified. If an error occurs, we will display the error message we received from OneDrive.

Your App will now show in the list of Apps. When you edit an existing capture or schedule a new capture, there is a new field for Apps. Click in the box to see the list of Apps available, or start typing its name to filter the list.

That’s it! Now your captures will be uploaded to your OneDrive account automatically. If there is any issue during the upload, we will send you an e-mail.
If you want to use different folders of files, you can create multiple apps for your OneDrive account.
How to add a timestamp to your capturehttps://blitapp.com/blog/how-to-add-a-timestamp-to-your-capture/ Mon, 13 Jun 2022 07:12:03 -0700https://blitapp.com/blog/how-to-add-a-timestamp-to-your-capture/Customers sometimes ask us how to include a timestamp in the capture or the URL of the web page captured. You can achieve this by injecting Javascript into the target page to add the timestamp and URL directly on the page.
In your capture, under Advanced Web Page Options, click on Edit Javascript. You can add the code below:
(function() {
 var d = new Date();

var date = d.toLocaleString("en-US", {
 timeZone: "America/New\_York"
 });

var div = document.createElement("div");
 var style = document.createAttribute("style");
 style.value = "position: fixed; width: auto; height: 40px; top: 0; left: 0; right: 0; bottom: 0; background-color: White; z-index: 9999999999; color: Black; font-size: 12px;";
 div.setAttributeNode(style);

div.innerHTML = date + "<br>" + document.location.href;

document.body.append(div);
})();
This adds a a DIV, 40px high (height: 40px), with a white background (background-color: White) and black font (color: Black; font-size: 12px;). To ensure the DIV is at the forefront of the page, we add a high z-index (z-index: 9999999999). This DIV is placed at the top left corner of the page (top: 0; left: 0;).
Here is an example applied to https://blitapp.com/

You can customize the style of the DIV and change the timezone used for the date.
New feature - schedule for a time periodhttps://blitapp.com/blog/new-feature-schedule-for-a-time-period/ Sun, 12 Jun 2022 07:12:03 -0700https://blitapp.com/blog/new-feature-schedule-for-a-time-period/We added a new type of schedule: time period. This allows you to schedule captures from one day (start date) to another (end date). This is great for capturing temporary pages that may exist for a few days or weeks.
This new option is available under Capture Schedule. It can be combined with specific days of the week.

If enabled, the time period will show in the capture summary:

This feature was requested by some of our users. Don’t hesitate to contact us about new features, improvements, etc.
Brave browser: capture websites with an ad blockerhttps://blitapp.com/blog/brave-browser-capture-websites-with-an-ad-blocker/ Fri, 25 Feb 2022 12:12:03 -0800https://blitapp.com/blog/brave-browser-capture-websites-with-an-ad-blocker/We have added the Brave browser to the list of browsers available for all captures. Brave browser is a modified version of Chromium, the open-source version of Chrome, with privacy protection such as ad blocker, tracking blocker, and anti-fingerprint solution.
You can capture websites to check how they look with an ad-blocker or some third-party tracking disabled.
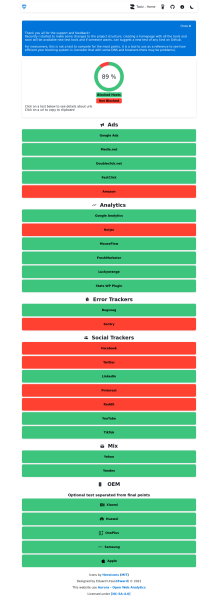
We have taken a screenshot of https://d3ward.github.io/toolz/adblock.html, a page that tests your browser’s ability to block various ads, analytics, and other tracking tools. Brave blocks most sites (around 90%), whereas Chrome blocks none.
Like other Chrome-based desktop and mobile browsers, Brave supports the dark mode we introduced last year.
 iPhone 12 available as a browserhttps://blitapp.com/blog/iphone-12-available-as-a-browser/
Sun, 25 Apr 2021 09:12:03 -0700https://blitapp.com/blog/iphone-12-available-as-a-browser/
iPhone 12 available as a browserhttps://blitapp.com/blog/iphone-12-available-as-a-browser/
Sun, 25 Apr 2021 09:12:03 -0700https://blitapp.com/blog/iphone-12-available-as-a-browser/We have added the iPhone 12 as a browser and the existing iPhone 5. We also made several improvements to both mobile browsers, including better support for mobile-only Javascript API.
The iPhone 12 has a native resolution of 320px by 480px, the iPhone 12 is 390px by 844px.

The iPhone 12 also supports the dark mode we introduced earlier.
Support for dark modehttps://blitapp.com/blog/support-for-dark-mode/ Wed, 21 Apr 2021 12:12:03 -0700https://blitapp.com/blog/support-for-dark-mode/You can now enable the dark mode in Chrome or iPhone. This changes the rendering of the page by switching the white background to black, for example.
To enable dark mode, open the Advanced Web Page Options. Then change Dark Mode from No to Yes.
For example, this is Wikipedia in dark mode on iPhone:

This feature enables the native dark mode that is built in Chrome; it does not use add-ons or any custom CSS.
Take screenshots of multiple pages behind a loginhttps://blitapp.com/blog/take-screenshots-of-multiple-pages-behind-a-login/ Mon, 15 Feb 2021 06:12:03 -0800https://blitapp.com/blog/take-screenshots-of-multiple-pages-behind-a-login/With the automation steps, you can now log in to a website and take multiple screenshots of different pages. The automation steps can handle complex logins over multiple pages. We have added the Initial Automation steps to make it easier to capture several pages after login.
This post will show you how to log in to a website, Browshot, and take several screenshots after authentication. The Initial Automation steps run once, before any of the capture URLs, to log in to the website. Then, Blitapp accesses each URL to take a screenshot.
To log in from the home page of https://browshot.com/, a user must click on Login. This displays a login form where the user will enter his username and password. Then the user clicks on “Login” to access his dashboard.

We’ll build the different steps to log in; then, we’ll navigate to other pages and take a screenshot. The hardest part of the process is getting the identifier (CSS selector) for each element we want to interact with: the button to click on, the input box to enter our username, etc. We must use the Developer Tools from our web browser to find this identifier. Press F12 to open the Developer Tools. Navigate to https://browshot.com/. In the Developer Tools, click on the mouse cursor at the top left corner (highlighted in red below).

Then, move your mouse to the Login button at https://browshot.com/. The HTML code corresponding to the button is now highlighted in the Developers Tools. Right-click on it and choose Copy > Copy selector:


If you paste the value into a text editor, you get the following:
#login-btnThis is the CSS selector that identifies the Login button. We’re ready to take the first step of clicking on the Login button:

The following steps are to enter the username and password in the login form. In your browser, manually click on the Login button to show the form. In the same way, use the Developer Tools to copy the CSS selector for the username and password input fields:
#login-form > input\[type=text\]:nth-child(1)
#login-form > input\[type=password\]:nth-child(2)
We use the “type” command to type the username and passwords in their respective input fields:

Then we click on the Login button at the bottom of the form:

This last step authenticates the user. All these steps must be added as Initial Automation steps:

Now we can add all the URLs we want to capture after logging in:

That’s it. Click on Save & Test to make sure you capture and all the steps are correct. You will find the three screenshots, one for each URL, in your history:

You can add more URLs to capture additional pages. You can also use the automation steps to click on page elements, expand or collapse sections, etc. We will post more examples on this blog.
Don’t hesitate to contact us if you need assistance with the automation steps.
Hide ads and other popupshttps://blitapp.com/blog/hide-ads-and-other-popups/ Sun, 20 Dec 2020 10:12:03 -0800https://blitapp.com/blog/hide-ads-and-other-popups/We have added the ability to hide most full-page ads and popups from most websites in just one click. These popups and overlays hide the main content and can be an issue for many users. Until now, you could use the automation steps to deal with them individually on each site. You can now hide these annoying popups by toggling one option.
Under Advanced Web Page Options, there is a new option at the top: Hide Popups. Change the option to Yes to turn on the new feature.

If you enable the option, the browser will try to find elements that hide the main content. Here are a few examples.
On ShoutMeLoud.com, there is a full-page advert that the user must close before the content is shown:

With Hide Popups set to Yes, the overlay is hidden, and the capture shows the content:

On many blogs and online stores, you may see a special offer with the main content blurred in the background:

With the new option to hide popups, the blog post is fully visible in the screenshot:

You can now hide ads on most sites. This option may not work with some URLs, or the page layout may be affected. You can use the automation steps to manage more complex cases. Don’t hesitate to contact us if you need assistance.
Monitor your Amazon listings with Blitapphttps://blitapp.com/blog/monitor-your-amazon-listings-with-blitapp/ Mon, 07 Sep 2020 13:32:03 -0700https://blitapp.com/blog/monitor-your-amazon-listings-with-blitapp/Many users subscribe to Blitapp to monitor their Amazon listings: product page, search results, reviews, special deals, etc.
Amazon tends to make unannounced and unwanted changes to listings. Our users want to quickly see when a change happens and be able to prove what their product page or search results looked like before the change. They the e-mail to quickly spot any changes to their page. The apps (typically Google Drive or Dropbox) keep an archive they can produce anytime.
With Blitapp, you can set up daily captures of all your listings and Amazon pages and receive screenshots directly in your inbox. You can split the captures to contain multiple screenshots — for example, to group the product description, reviews, and search into one e-mail.
You can also set up captures at specific dates — for example, to track limited special offers. Set up an App, like Google Drive or Dropbox, to share screenshots or archive them for years.
Customize the capture e-mailshttps://blitapp.com/blog/customize-the-capture-e-mails/ Sun, 07 Jun 2020 09:32:03 -0700https://blitapp.com/blog/customize-the-capture-e-mails/You can customize the capture e-mails sent by Blit with different templates, as well as a different sender and reply.
Under Account, there are two fields that you can use to customize the e-mail. The first is the From field. It will change the sender that is displayed in your e-mail client. You can change it to any value. For example, if you use My Company, it will look like this in Gmail:

The second field, Reply To, is the e-mail address used when a user wants to reply to the e-mail. It should be a valid e-mail address.
You can choose between two templates: Default and Minimal. Click on preview to see what the e-mail subject and content will look like for each of them.

We offer custom templates with your own branding, starting at $15/month. Contact us for more information.
You can set the list of e-mail recipients and the e-mail template in each capture. However, if you have a long e-mail list, you might find it cumbersome to update it across many captures.
You can now manage your e-mail lists in one place with the new e-mail App. The App contains all the e-mail addresses and the template. You can use it for many captures. The verification feature of the e-mail App will check whether any e-mail address is blocked by Blitapp.

You can combine the e-mail App and the e-mail feature to add one or more recipients for different captures.
Receive your captures in Slackhttps://blitapp.com/blog/receive-your-captures-in-slack/ Fri, 08 May 2020 05:32:03 -0700https://blitapp.com/blog/receive-your-captures-in-slack/You can upload screenshots directly to your cloud storage through Apps. The Slack App allows you to receive your captures in a Slack channel.
To start sending captures as Slack notifications, follow these steps:
First, you will need to create an Incoming WebHooks App in Slack.
Click on this link to create a new Slack App. Enter the following information:
Then, choose Incoming Webhooks. Make sure you Activate Incoming Webhooks.

At the bottom of the page, click on Add New Webhook to Workspace.

On the next screen, choose the channel where the new App should post the captures. Click on Allow.
On the next screen, copy the URL generated at the bottom of the screen. You will need it in Blitapp.

In Blit, go to Apps and click Add an App. Choose Slack as the type. Enter a name for your Slack App.
Under Webhook URL, enter the URL you copied from Slack. Click on Verify. You should see a notification in your Slack channel.
Your Slack App is ready to use. You can add it to any capture to post the screenshots directly to your Slack channel.
How to get a high-resolution screenshothttps://blitapp.com/blog/how-to-get-a-high-resolution-screenshot/ Tue, 05 May 2020 05:32:03 -0700https://blitapp.com/blog/how-to-get-a-high-resolution-screenshot/Blitapp takes all captures in high resolutions, up to 2,000px by 20,000px. Full-page screenshots usually don’t fit on a screen. Therefore, your web browser scales down the image to fit the screen. A full-page capture would look like this in your browser – a small image with a plain black background:

If you hover over the image, your mouse pointer will change to a magnifier. Click on the image, and you’ll see the original image:

The same type of scaling down is done in e-mails. We send high–resolution screenshots to your inbox. However, your e-mail provider, whether Gmail, Outlook or another, scales down the image to fit your browser or reader. In this example, the whole–page capture of Amazon looks blurry in the e-mail:

If you click on the image, you get an even smaller image that fits in your window. You can click on it several times to zoom in until you see the original image.

What is the best way to see the full high-resolution capture? If you go to your Blitapp history (https://blitapp.com/app/history), click on View Image to see the capture in its original size. In other places, whether in your inbox or your cloud storage, it is best to download the image onto your computer and use your favorite image reader.
Login to a website to take screenshotshttps://blitapp.com/blog/login-to-a-website-to-take-screenshots/ Sat, 25 Apr 2020 07:12:03 -0700https://blitapp.com/blog/login-to-a-website-to-take-screenshots/With the automation steps, you can now log in to a website and take multiple screenshots of different pages. The automation steps can handle complex login over numerous pages.
In this post, we’ll show you how to log in to a website, Browshot, and take a screenshot after authentication.
To log in from the home page of https://browshot.com/, a user must click on Login. This displays a login form where the user has to enter his username and password. Then the user clicks on “Login” to access his dashboard.

We'll build the different steps to log in; then, we'll navigate to a separate page in the dashboard and take screenshots. The hardest part of the process is to get the identifier (called CSS selector) for each element we want to interact with: the button to click on, the input box in which to enter our username, etc. We need to use the Developer Tools from your web browser to find this identifier. Press F12 to open the Developer Tools. Navigate to https://browshot.com/. In the Developer Tools, click on the mouse cursor in the top left corner (highlighted in red below).

Then, move your mouse over the Login button at https://browshot.com/. The HTML code corresponding to the button is now highlighted in the Developers Tools. Right-click on it and choose Copy > Copy selector:


If you paste the value in a text editor, you get the following:
#login-btnThis is the CSS selector that identifies the Login button. We’re ready to take the first step by clicking on the Login button:

The following steps are to enter the username and password in the login form. In your browser, manually click on the Login button to show the form. In the same way, use the Developer Tools to copy the CSS selector for the username and password input fields:
#login-form > input\[type=text\]:nth-child(1)
#login-form > input\[type=password\]:nth-child(2)
We use the “type” command to type the username and passwords in their respective input fields:

Then, we click on the Login button at the bottom of the form:

This last step authenticates the user and loads https://browshot.com/dashboard. We can take a screenshot of the dashboard or any other page. After login in, we wait a couple of seconds for the login to work, then navigate to https://browshot.com/dashboard/settings:

Finally, we wait a few seconds to allow the page to load. Then we take a screenshot of it:

You can add more steps to navigate to multiple pages and take multiple screenshots, click on elements in the pages, etc. We will post more examples on this blog.
Creating this kind of automation can be difficult at first. We are here to help. Don’t hesitate to contact us if you need assistance.
Update: We made it easier to capture multiple pages after login with the initial automation steps .
New features - automation stepshttps://blitapp.com/blog/new-features-automation-steps/ Mon, 20 Apr 2020 07:12:03 -0700https://blitapp.com/blog/new-features-automation-steps/With Blitapp, you can inject JavaScript into any page to log in, click on elements, etc. To expand the range of possible interactions and simplify them, we have added automation steps.
On this blog, we will post several examples using automation steps, including:
The automation steps describe the list of commands that the browser must execute. Unlike the injected JavaScript, these steps can be carried out over multiple pages and generate multiple screenshots. Each step contains:
These steps are used to log in to https://browshot.com and take threes screenshots:

You can add steps under Advanced Web Page Options. Don’t hesitate to contact us if you need help with the automation steps.
New warning about blocked e-mailhttps://blitapp.com/blog/new-warning-about-blocked-e-mail/ Thu, 19 Mar 2020 13:12:03 -0700https://blitapp.com/blog/new-warning-about-blocked-e-mail/To remain compliant with our e-mail provider, we must block invalid e-mail addresses, addresses that have bounced, etc. Every day, we get reports about such e-mail addresses and add them to our denylist. These e-mails cannot receive any notification from us, including information about a capture, a password reset, etc.
Now you will see a warning if your account e-mail address has been blocked and if any e-mail recipient of your capture is on our denylist. You can open a support ticket to solve the issue and get the e-mail allowed again.
If your account e-mail address is blocked, you will find this warning at the top of each page and under Account:

If a capture contains an e-mail address that is blocked, you will see a similar warning at the top and bottom of the capture page:

Check that the e-mail address is spelled correctly, and contact the owner to determine whether they recently had an issue (e.g., mailbox full, change of e-mail, etc.) or whether they have blocked messages from blitapp.com.
New features - test your capture, bulk edithttps://blitapp.com/blog/new-features-test-your-capture-bulk-edit/ Wed, 18 Mar 2020 07:12:03 -0700https://blitapp.com/blog/new-features-test-your-capture-bulk-edit/We have made two improvements to Blitapp:
You can test your captures without waiting for the scheduled time to kick in. In your capture, there is a new button Save & Test. It works for all captures, even paused captures. This saves any change you may have done to your capture and run a test. It will then display the history of the capture. Your test will show as IN PROGRESS. When the capture is done, it will change to SUCCESS or ERROR. If you close the history, you can click on the History link at the bottom of the page to see the history popup again.

Tests count towards your monthly plan. Tests run as regular capture. An e-mail will be sent (if enabled) to all the recipients, and Apps will run.
We made it easier to make changes across captures. This is particularly useful if you have similar captures and need to update them all at once. There is a new Bulk Edit entry in the left menu. It will display some of the settings of all your captures.
You can filter the list of captures based on tags and on their properties (paused or active). You can also decide what properties to display or hide. Changes are applied after you click on Save all changes.

Let us know if you need additional filters or properties displayed.
Some users requested these two features. We also added a couple of smaller improvements, such as the comment section at the end of the capture after customers requested it. Don’t hesitate to contact us about new features, improvements, etc.
Capture a web page behind a login formhttps://blitapp.com/blog/capture-a-web-page-behind-a-login-form/ Sun, 26 Jan 2020 06:12:03 -0800https://blitapp.com/blog/capture-a-web-page-behind-a-login-form/Update: Use the automation steps to login to a website. It is easier to set up and can handle complex login pages.
With Blit, you can inject JavaScript code into a page to create complex interactions. You can use this functionality to log into a website before you capture a page.
The JavaScript code must replicate the following:
The first step is to identify the username and password fields. We will use CSS selectors to identify the two fields. You can find additional information about retrieving CSS selectors in this post.
We will use the Browshot login page as an example: https://browshot.com/login. This page has two forms; the first is used for logging into the dashboard.

To get the CSS selector for the username field, right-click on it and choose Inspect :

Right-click on the highlighted HTML. Select Copy and then Copy selector :

You can paste the selector into a text file to see its value:
#usernameDo the same for the login field and the login button. The CSS selectors are:
#password
body > section:nth-child(2) > div > div > div.wrap-small.contact > form > div.grid\_12.center > input
The selector for the login button can be simplified:
input.btn-green\[value=Login\]Now, let’s use the following JavaScript template:
(function () {

var username\_field = "#username"; // username box
 var password\_field = "#password"; // password field
 var login\_button = "input.btn-green\[value=Login\]";

var username = "my username"; // Update with your login
 var password = "my password"; // Update with your password

// This function checks on whether the username field is present
 var check = function(element) {
 var found = document.querySelectorAll(element);

if (found.length == 0) {
 // the field is not present; check again later
 setTimeout(check, 500, element);
 }
 else {
 // the field is present, fill out the form
 document.querySelector(username\_field).value = username; // enter username
 document.querySelector(password\_field).value = password; // enter password

document.querySelector(login\_button).click(); // submit the form
 }
 };

// call the function above
 check(username\_field);
})();
This JavaScript code waits for the login form to be displayed, then fills it out and submits the credentials. You should check it by running it in your browser. Go to the Browshot login page in Chrome and press F12 to show the Chrome Developer Tools. Under Console , paste the code above. (You will get a login error, as these are not real credentials.)
Now, you can use this JavaScript code in your capture. Under Advanced Web Options , do the following:
If you need help with logging into a website or with any other type of website interaction, do not hesitate to contact us.
How to hide a cookie banner and adshttps://blitapp.com/blog/how-to-hide-a-cookie-banner-and-ads/ Sat, 25 Jan 2020 08:12:03 -0800https://blitapp.com/blog/how-to-hide-a-cookie-banner-and-ads/Sometimes, pages display banners or overlays—such as cookie banners, subscription popups, etc.—that hide the pages’ main content. With Blitapp, you can hide these banners and overlays before taking a screenshot of the page.
We’ll go through a couple of examples to explain how to find the element to hide or click on and add it to your capture settings. If you find this post too complicated and aren’t sure how to hide elements for your captures, don’t hesitate to contact us for assistance.
The news website The Guardian (https://www.theguardian.com/us) asks the user to accept cookies with a banner at the bottom of the page.

To hide the banner, you have two choices:
For this example, we will click on the button. To tell Blitapp what to click on, we need to find the identifier for this button. We use CSS selectors for defining DOM elements. Chrome offers an easy way to get the CSS selector of any element.
Right-click on the button. A menu will appear. Choose Inspect.

This opens the Chrome Developer Tools. Chrome displays the HTML structure of the page. The only thing that is important here is that Chrome highlights the HTML for the button we selected with a light blue background:

Right-click on the highlighted code. In the new menu, choose Copy and then Copy selector.

This has copied the CSS sector to your clipboard. If you paste it somewhere, it will look like this:
#cmpContainer > div > div > div.css-13we0ur > div.css-14xb8m-buttonContainerStyles > button.css-8k87rr-button-defaultSize-iconDefault-iconRight-mobileButtonStylesIt is possible to simplify the CSS selector, but we can use it as it currently is.
Copy this value inside your capture under Advanced Web Options > Click on element.

Now, Blitapp will click on the button to accept the cookie before taking a screenshot so that you won’t see the banner in your images.
If you want to check whether you have the right element sector, you can simulate the click in your browser. Press F12 to open the Chrome Developer Tools, then click on Console. Type the following command:
document.querySelector("#cmpContainer > div > div > div.css-13we0ur > div.css-14xb8m-buttonContainerStyles > button.css-8k87rr-button-defaultSize-iconDefault-iconRight-mobileButtonStyles").click();This will simulate a mouse click on the selected element. You can verify that this does close the cookie banner.
If you can’t find the CSS selector for the elements you want to click, don’t worry. Send us an em-mail and we’ll help you.
The process for hiding elements on a page, such as an ad, is the same, First, decide which elements should be hidden or closed, and then find the CSS selector to add it to your capture.
Here’s a page that shows an ad over the main content: Justinmin

On this page, you can see the ad with a blue or purple background, but you also see that all of the content is hidden behind a semi-transparent black overlay. Once again, we have two choices for hiding the ad:
The first option is easier but let’s go for the second one. Right-click on the semi-transparent overlay and choose Inspect.

Unfortunately, the highlighted element is not exactly the element you need to hide. To understand why, right-click on it, and select Delete element. You’ll see that the semi-transparent overlay is gone, but the ad is still there. For this page, you must select the div element above in the HTML tree:

The CSS selector is:
#wisepops-rootTo double-check that you have the right CSS selector, right-click on the same div and choose Delete element. This time, the ad is gone, too.
To use this selector in Blitapp, go to your Blitapp capture, open Advanced Web Options , and, under Hide element , copy your CSS selector:

Getting the right element and CSS selector can be tricky, but we’re here to help.
Through Blitapp, you can engage in more advanced interactions with the page, including multiple actions, changing forms, etc. We’ll post examples of more complicated actions on this blog.
Choose the image quality and sizehttps://blitapp.com/blog/choose-the-image-quality-and-size/ Sat, 18 Jan 2020 08:32:03 -0800https://blitapp.com/blog/choose-the-image-quality-and-size/Blitapp used to take screenshots as JPEG files. When we took over Blitapp, we switched to better-quality PNG images. But these PNG files can be much larger, going over 15MB for a full-page screenshot.
Now, you can choose between JPEG and PNG for all your captures. Click on Advanced Web Options, and you will find the new option \*Image Quality” to switch between PNG and JPEG.

Here are a couple of examples to give you an idea of the file size and quality for both formats. You can open both images in new tabs to compare the quality:
Amazon product page, 1,280 x 7,941px
Instagram homepage, 1,280 x 10,830px
The difference in file size gets bigger as the screenshot size is bigger, but it also depends on how “busy” the web page is.
Send your screenshots to your Google Drivehttps://blitapp.com/blog/send-your-screenshots-to-your-google-drive/ Sat, 18 Jan 2020 08:12:03 -0800https://blitapp.com/blog/send-your-screenshots-to-your-google-drive/
You can now upload your screenshots directly to your cloud storage through Apps, including your own Google Drive.
To start uploading your captures to your Google Drive, follow these steps:
We have created an app for Google Drive that lets us upload your screenshots into your account. The first step is to authorize this app to access your account.
The left menu has a new entry for Apps. There, you will see all the apps that you create. Click on Add an App.
Choose GDrive as the type.
Under URL, you will see a link to Authorize the Blitapp Google App. Click on it.

You will be redirected to google.com to authorize our app. Then you will be taken back to the app creation page.
Once the Blitapp App has been authorized, you can create multiple Google Drive Apps with different folders and file names.
Now that the Blitapp App has been authorized, you can finish configuring your app on Blitapp.com.
Choose a custom name that will be used to reference the app when captures are created or edited. You can enter the custom folder and file names that will be used for each image. We support a number of variables for creating dynamic paths. See our previous post for more information.
Before saving the app, click on Verify to ensure it is correctly configured. Blit will attempt to upload the file blit.png to the folder you specified. If an error occurs, we will display the error message we received from Google. You can find the test file in your Google Drive.

Your app will now show in the list of apps. When you edit an existing capture or schedule a new capture, there will be a new field for apps. Click in the box to see the list of apps available, or start typing its name to filter the list.

That’s it! Now your captures will automatically be uploaded to your Google Drive. If there are any issues during the upload, we will send you an e-mail.
If you want to use different folders of files, you can create multiple apps for your Google account.
Webhook notificationshttps://blitapp.com/blog/webhook-notifications/ Sun, 03 Nov 2019 05:12:03 -0800https://blitapp.com/blog/webhook-notifications/
We have added the ability to get notifications through webhooks every time a capture is complete. You can use webhooks to integrate Blitapp with many other services, such as Zapier.
To start with webhooks, follow these steps:
We support HTTP and HTTPS webhook, but we strongly recommend using HTTPS. Your webhook should process notifications within 60 seconds and return 200 OK.
Blit will send one notification for each capture, with information about all URLs in the capture. We send a POST request in this format:
User-Agent: Blitapp/Webhook
Content-Type: application/json

{
 "type": "production",
 "version": "v1",
 "date": "2019-11-03T20:01:16.313Z",
 "capture": {
 "name": "My capture",
 "urls": \[\
 {\
 "url": "https://www.example.com/",\
 "image": "https://blitapp-images.com/file?query\_sring",\
 "status": "OK"\
 }\
 \]
 }
}The information is sent as JSON:
Go to Apps and click Add an App. Choose Webhook as the type. Enter a name for your Webhook type.
Then, you should test your webhook by clicking on “Verify”. A request with the format (type: “test”) above will be sent to your webhook. If any problem occurs, it will be reported there.
Here is an example of the request sent to verify your webhook:
{
 "type": "test",
 "version": "v1",
 "date": "2019-11-03T11:53:45-08:00",
 "capture": {
 "name": "test",
 "urls": \[\
 {\
 "url": "https://blitapp.com/",\
 "image": "https://blitapp.com/img/blit\_logo.svg",\
 "status": "OK"\
 }\
 \]
 }
}Your App will show in the list of Apps available. When you edit an existing capture or schedule a new capture, there is a new field for Apps. Click in the box to see the list of Apps available, or start typing its name to filter the list.

Every time a capture is complete, a notification is sent to your webhook.
Archive your screenshots to your Dropbox accounthttps://blitapp.com/blog/archive-your-screenshots-to-your-dropbox-account/ Sat, 02 Nov 2019 07:12:03 -0700https://blitapp.com/blog/archive-your-screenshots-to-your-dropbox-account/
You can now get your screenshots uploaded directly to your cloud storage through Apps, including your own Dropbox account.
To start getting your captures uploaded to your Dropbox account, follow these steps:
We have created an app for Dropbox that lets us upload screenshots into your account under Apps/Blitapp. The first step is to authorize this App to access your account.
The left menu has a new entry for Apps. There, you will see all the Apps that you create. Click on Add an App.
Choose Dropbox as the type.
Under URL, you will see a link to Authorize the Blitapp Dropbox App. Click on it.

You will be redirected to Dropbox.com to authorize our App, then back to the App creation page.
Once the Blitapp App has been authorized, you can create multiple Dropbox Apps with different folders and file names.
Now that the Blitapp App has been authorized, you can finish configuring your App on Blitapp.com.
Choose a custom name that will be used to reference the App when creating or editing captures. You can enter the custom folder and file name used for each image. We support several variables to create dynamic paths. See our previous post for more details.
Before you save the App, click on Verify to ensure it is configured correctly. Blit will attempt to upload the file blit.png to the folder you specified. If an error occurs, we will display the error message we received from Dropbox. You can find the test file under Apps/Blitapp in your Dropbox account.

Your App will now show in the list of Apps. When you edit an existing capture or schedule a new capture, there is a new field for Apps. Click in the box to see the list of Apps available, or start typing its name to filter the list.

That’s it! Now your captures will be uploaded to your Dropbox account automatically. If there is any issue during the upload, we will send you an e-mail.
If you want to use different folders of files, you can create multiple apps for your Dropbox account.
See your screenshots in your favorite RSS readerhttps://blitapp.com/blog/see-your-screenshots-in-your-favorite-rss-reader/ Wed, 30 Oct 2019 06:12:03 -0700https://blitapp.com/blog/see-your-screenshots-in-your-favorite-rss-reader/
We have added a new App: RSS. Unlike the other Apps, it does not store your screenshots on your own cloud but offers an alternative to e-mail to visualize and share your web captures.
To start generating your RSS feed(s), follow these steps:
The left menu has a new entry for Apps. There, you will see all the Apps that you create. Click on Add an App.
Enter a name for your RSS App. This will be your RSS feed title. Choose RSS as the type.
That’s it! The page shows you the URL of your feed. The same URL is also displayed in the list of Apps.

Your App will show in the list of Apps available. When you edit an existing capture or schedule a new capture, there is a new field for Apps. Click in the box to see the list of Apps available, or start typing its name to filter the list.

Every time a capture is done, it will be added to the RSS feed(s) you defined.
Take the URL of your RSS feed from the list of Apps and add it to your favorite RSS reader. The feed is built as follows:
You can check this feed generated by Blit as an example: https://blitapp-rss.s3-us-west-2.amazonaws.com/9485b1dc-7e5f-46bc-a30e-82aa9a8e4f4b

You can add multiple captures to the same feed or create different feeds for different captures.
Save your web captures to your FTP serverhttps://blitapp.com/blog/save-your-web-captures-to-your-ftp-server/ Fri, 25 Oct 2019 08:12:03 -0700https://blitapp.com/blog/save-your-web-captures-to-your-ftp-server/
You can now get your screenshots uploaded directly to your cloud storage through Apps, including your own FTP server.
To start getting your captures uploaded to your FTP server, follow these steps:
Make sure your FTP server can be accessed from the Internet. We recommend that you create a separate user for Blitapp. This user must be permitted to create folders and files and navigate in the folders created.
In the left menu, there is a new entry for Apps. There, you will see all the Apps that you create. Click on Add an App.
Enter the username and password used by Blit to authenticate to the server. Add the FTP port number.
You can enter the custom folder and file names that will be used for each image. We support several variables to create dynamic paths. See our previous post for more details.
Before you save the App, click on Verify to make sure it is configured correctly. Blit will attempt to upload the file blit.png to the folder you specified. If an error occurs, we will display the error message we received.
Your App will now show in the list of Apps. When you edit an existing capture or schedule a new capture, there is a new field for Apps. Click in the box to see the list of Apps available, or start typing its name to filter the list.

That’s it! Now your captures will be saved to your FTP server automatically. If there is any issue during the upload, we will send you an e-mail.
If you want to use different folders of files, you can create multiple Apps with the same FTP server.
Upload your screenshots to Azurehttps://blitapp.com/blog/upload-your-screenshots-to-azure/ Fri, 25 Oct 2019 07:12:03 -0700https://blitapp.com/blog/upload-your-screenshots-to-azure/
You can now get your screenshots uploaded directly to your cloud storage through Apps, including to your Azure storage container. You can use multiple containers for different captures or the same container with other folders or file names for each screenshot.
To start getting your captures uploaded to your Azure container, follow these steps:
In your Azure portal, create a new Storage Account or use an existing one. Create a new private container, for example blit-test.
To give access to Blit to this container, you need to switch to Microsoft Azure Storage Explorer available for Windows, Linux, and MacOSX. Open the software and look for the Blob Container you created. Right-click on it and choose Get Shared Access Signature.

Make sure you set the Expiry time far in the future.
Check the following permissions:
Then click on Create. The software will show the Shared Access Signature information. Copy the URI that you will need to paste into your Blit App.
The left menu has a new entry for Apps. There, you will see all the Apps that you create. Click on Add an App.
Enter a name for your App. Choose Azure as type.
Enter the name of your container, such as blit-test.
Under Container URL with SAS token, paste the URL you obtained from Microsoft Azure Storage Explorer.
You can enter the custom folder and file names that will be used for each image. We support several variables to create dynamic paths. See our previous post for more details.
Before you save the App, click on Verify to make sure it is configured correctly. Blit will attempt to upload the file blit.png to the folder you specified. If an error occurs, we will display the error message we received from Azure.
Your App will now show in the list of Apps. When you edit an existing capture or schedule a new capture, there is a new field for Apps. Click in the box to see the list of Apps available, or start typing its name to filter the list.

That’s it! Now your captures will be uploaded to your Azure container automatically. If there is any issue during the upload, we will send you an e-mail.
If you want to use different folders of files, you can create multiple apps with the same container.
Save your captures on your own S3 buckethttps://blitapp.com/blog/save-your-captures-on-your-own-s3-bucket/ Fri, 25 Oct 2019 06:12:03 -0700https://blitapp.com/blog/save-your-captures-on-your-own-s3-bucket/
You can now get your screenshots uploaded directly to your cloud storage through Apps, including to your own AWS S3 bucket. You can use multiple buckets for different captures or the same bucket with other folders or file names for each screenshot.
To start getting your captures uploaded to your S3 buckets, follow these steps:
Create a new bucket with the AWS console. In AWS, click on your new bucket name and go to Permissions. Then click on Access Control List. Under Access for other AWS Accounts, click the button Add account. Add the following Canonical ID: 877f5fce8118db233f7c1d7167b0ee8cbe9601e3b83000e7904d53706af361c9
Give Blit the following permissions:

Your bucket is now ready to receive screenshots from Blit. It may take up to 30 minutes for your bucket to be fully ready.
The left menu has a new entry for Apps. There, you will see all the Apps that you create. Click on Add an App.
Enter a name for your App. Choose S3 as type.
Enter the name of the bucket you created, such as blit-mybucket.
You can enter the custom folder and file names that will be used for each image. We support several variables to create dynamic paths; see our previous post for more details.
Before you save the App, click on Verify to make sure it is configured correctly. Blit will attempt to upload the file blit.png to the folder you specified. If an error occurs, we will display the error message from AWS.
Your App will now show in the list of Apps. When you edit an existing capture or schedule a new capture, there is a new field for Apps. Click in the box to see the list of Apps available, or start typing its name to filter the list.

That’s it! Now your captures will be uploaded to your S3 bucket automatically. If there is any issue during the upload, we will send you an e-mail.
If you want to use different folders of files, you can create multiple apps with the same bucket.
Introducing Apps for Blitapphttps://blitapp.com/blog/introducing-apps-for-blitapp/ Fri, 25 Oct 2019 05:12:03 -0700https://blitapp.com/blog/introducing-apps-for-blitapp/You can now get your screenshots uploaded directly to your cloud storage through Apps as easily as you get your web captures in your inbox. Once an App is defined, it can be used in one or many captures. Currently, we support uploading to your AWS S3 bucket, Azure Blob storage, and FTP server. We will add more Apps shortly.

You can upload your screenshots in multiple names with custom folder and file names.

Getting started with Apps easy:
The left menu has a new entry for Apps. There, you will see all the Apps that you create. Click on Add an App.

Enter a name for your App and one of the types supported. Then configure your App to allow Blit to upload your captures. We have instructions to configure each App when you click on “Support” (right side) and on this blog:
You can enter the custom folder and file names that will be used for each image. We support several variables to create dynamic paths:
<year>: 4-digit year, e.g. 2019
<month>: 2-digit month, e.g. 02
<day>: 2-digit day of the month, e.g. 09
<hour>: 2-digit hour of the day, 24-hour format, e.g 15
<minute>: 2-digit minute, e.g. 01
<date>: same as <year>-<month>-<day>, e.g. 2019-02-09
<capture\_name>: the name of the capture. The name will be normalized, so “My Capture” will become My\_Capture.
<browser>: the browser used, e.g. Chrome
<country>: the country selected, e.g. USA
<height>: the browser height, e.g. 1024
<width>: the browser width, e.g. 1280
<size>: the size of the screenshot, e.g., Full\_Page or Screen
<domain>: the link hostname, e.g. www.google.com
<url>: the full link. After normalization, https://www.google.com/?q=test&gl=USA would become https\_www.google.com\\\_q\\\_test\\\_gl\\\_USA
<random>: a random string in a form of a UUID, e.g. 936cbd00-ea49-11e9-8c5f-a901c1b99c6b
<count>: for a group of URLs, the index of the URL, e.g., 0, 1, 2, … if the capture has only one URL, it will always be 0.
Here are some examples of path and file names for different types of captures.
For a daily capture of the website Browshot.com, you could save all the captures in the same path browshot.com and use <date>.png as the file name.
The captures will be uploaded as browshot.com/2019-10-18.png, browshot.com/2019-10-19.png, etc.
For a daily capture of 3 websites (mysite.com, mysite.net, and mysite.org), use the domain name of each URL as the file name and the data and name of the capture for the folder.
The captures will be uploaded as 2019-10-18/my\_capture/mysite.com.png, 2019-10-18/my\_capture/mysite.net.png, 2019-10-18/my\_capture/mysite.org.png.
Once the App is configured, you can verify that it works well by clicking on Verify. Blit will upload an empty file and will report any error.
Your App will now show in the list of Apps. When you edit an existing capture or schedule a new capture, there is a new field for Apps. Click in the box to see the list of Apps available, or start typing its name to filter the list.
That’s it! Now your captures will be uploaded to your cloud automatically. If there is any issue during the upload, we will send you an e-mail.
Capture your entire website or bloghttps://blitapp.com/blog/capture-your-entire-website-or-blog/ Fri, 11 Oct 2019 05:12:03 -0700https://blitapp.com/blog/capture-your-entire-website-or-blog/After adding support for the taking of captures of a fixed list of URLs all at once, we added support for dynamic lists hosted on any website:

We can always support additional types of feeds; don’t hesitate to contact us.
To check on whether the external feed is accessible by Blit and supported, click on the Test button. Blit will fetch the external source, extract all the URLs, and display them.

These feeds can contain hundreds, or even thousands, of URLs. To ensure that you don’t run out of credits, you can limit the number of captures we run.
When the captures are done, you will get a single e-mail containing all the images. You will also find an entry for each capture in your history.

We hope that you found this helpful. We are looking at adding more features in the coming weeks.
Group of screenshots, more accessible schedulehttps://blitapp.com/blog/group-of-screenshots-more-accessible-schedule/ Tue, 08 Oct 2019 05:12:03 -0700https://blitapp.com/blog/group-of-screenshots-more-accessible-schedule/We have just added the ability to capture a group of URLs simultaneously. Edit or create a new capture. Next to Web Page link, choose multiple. You can enter many URLs, one per line.

All screenshots will be taken at the same time. A single e-mail is sent with all captures. You may notice that the images are not sent as attachments anymore but as external images. This allows us to fit many screenshots in one e-mail without worrying about a size limit, and to include much better quality images. This will soon be extended to single captures.

If some web captures fail, they will be mentioned at the top of the e-mail. The history will contain one entry for each URL.

This new feature is still in beta; we welcome your feedback to make further improvements.
We also made scheduling capture easier to understand. While we cover all of the uses cases we did before, it’s now easier to schedule:

Following the acquisition by Browshot, we have started integrating the Browshot API with Blitapp. This will allow Blitapp users to enjoy better screenshots and new features.
Users are being migrated to Browshot. You will receive an e-mail when your account uses the Browshot API. You will observe some differences after your account has been moved to Browshot. We will be updating this blog post with information about new features and changes in behavior:
Browshot has acquired the screenshot scheduler Blitapp.com.
Blit will continue to serve current and future users. We will move the back end to the Browshot platform, but Blit will continue to operate as a separate screenshot service.
We will make gradual improvements to Blit. All changes will be announced on this blog.
Browshot is the most powerful screenshot service. Browshot offers unique features such as automated uploads to S3, custom requests (cookies, POST data, custom JavaScript, etc.), mobile browsers like the iPhone and Android, etc.
Don’t hesitate to contact us if you have any questions about Browshot or the acquisition.
Browshot also owns Thumbalizr, acquired in 2014. Blit completes the offering of screenshot services by adding a scheduler.

Browshot is the most powerful screenshot service. Browshot offers unique features such as automated uploads to S3, custom requests (cookies, POST data, custom JavaScript, etc.), mobile browsers like the iPhone and Android, etc.

Thumbalizr is designed to embed screenshots easily on a website. Thumbalizr focuses on simplicity and ease of use

Blit allows users to schedule multiple screenshots and automatically receive the thumbnails in their inbox.
Blit will benefit from Browshot’s powerful and reliable screenshot API. Browshot has processed over 60 million screenshots since 2011.
This acquisition shows the Browshot team’s commitment to being a major player in the screenshot market. We are committed to growing our business and making Browshot a reliable partner.
We will be making many improvements to Blit. We will communicate all the changes and enhancements through this blog. Don’t hesitate to contact us if you have questions about Browshot, Thumbalizr, or the acquisition.
Ready to experience the benefits of website screenshots? Sign up for a free trial. No Credit card is required. Blit Automated Website Screenshots.
Automated Website Screenshots for Your Businesshttps://blitapp.com/blog/automated-website-screenshots-for-your-business/ Wed, 27 Mar 2019 15:12:03 -0700https://blitapp.com/blog/automated-website-screenshots-for-your-business/The effectiveness of online marketing and business management is of the utmost importance in today’s world. Businesses that fail to use the internet to their advantage struggle to target the right audience and generate sufficient amount of revenue. New technology for business is taking Automated Screenshots of Websites via the cloud.
A screenshot is a picture you can capture of the entire screen to view it later or use it for different purposes. Setting up automated screenshots for your website or of competitors’ websites can reap a lot of advantages, and a business that has a functional website can benefit from the use of screenshots in a variety of different ways. Furthermore, the feature of automated screenshots can help save a business a great deal of time that might otherwise be wasted when taking them manually.

Enter Blit. Blit is a type of software that allows you to take periodic screenshots of any website, which can later be used to evaluate different situations and make important decisions about the future of the business and the marketing strategy on the whole. It offers various tools that can prove highly effective in helping the company stay one step ahead of the competition and attract the right traffic to the website. Blit is available online to be tried free of cost. This is a significant advantage because taking screenshots can bring so many opportunities to a business without any high costs.

One of the most prominent uses of automated screenshots is brand management. Regular automatic screenshots can help give you a clearer picture of how the world sees your brand. Your online marketing strategy is supposed to look attractive and catch the eye of relevant traffic. Using screenshots, you can see how your website is presented to potential customers and then make decisions regarding any edits you might want to make. Screenshots are a great way to get a look into the customer’s perspective, which can significantly assist your website designers and developers in understanding what additions or subtractions need to be made.

Similarly, screenshots can help you with the quality assurance of your website. Regular automated website screenshots tell you how the website looks from time to time, and they are a convenient way to determine the content you’d like to be displayed on the webpage.

Another major application of automated website screenshots is the ability to keep an eye on competitors. Automatic screenshots can regularly tell you what your competitors are up to and if they have made any changes to their webpage that might give them an edge over you. Determining this promptly can help ensure a prompt response from your web developers as well so that they can update your website as soon as possible if the changes can be applied to your business. It might be a new style of content that the competitor is using or a new technique of displaying a banner that can make all the difference in the number and relevance of the traffic attracted to the webpage.

Likewise, automated screenshots can also be used to keep a check on other social media pages of your competitors to ensure that there is not a trend that you might be missing out on. Additionally, Search Engine Optimization is one of the most crucial tools that are required by any effective online webpage marketing, and automated screenshots can help you better understand how your site is ranking on different search engines. SEO is extremely fundamental in making sure your website is able to attract a large amount and relevant type of traffic onto it. Google and other search engines have specific criterion through which they rank different websites and it is highly recommended to meet these criterion in order to make sure your website is displayed in front of people that might be potential clients.
Ready to experience the benefits of website screenshots? Sign up for a free trial. No Credit card is required. Blit Automated Website Screenshots.
How To Land Your Dream Job by Automating Your Job Searchhttps://blitapp.com/blog/how-to-land-your-dream-job-by-automating-your-job-search/ Thu, 05 Apr 2018 15:12:03 -0700https://blitapp.com/blog/how-to-land-your-dream-job-by-automating-your-job-search/
Looking to move up in your career? Or find the perfect remote Job so you can live anywhere? Or work for the company that you’ve always wanted to? Be the first to know when one of these coveted career opportunities comes available. You can do this by scheduling automated screen captures to send you job listing updates. You’ll get an email periodically showing what jobs are available.
Here’s how:
###1. Go to a job search website or the careers page of the company you want to work for.

###2. Set the search criteria for the job you are looking for.

###3. Copy the browser url.

###4. Go to https://blitapp.com, paste the URL and click “Capture Website”.

###5. Enter your email address and click submit.

You’ll now get the Job Listings emailed to you every day. You’ll know when a new job becomes available and can quickly respond and submit your résumé. After creating your first website capture, you can also edit the capture frequency or create new captures of other job sites. For only $5 per month, you can upgrade to get 300 captures. That’s about 10 captures a day and just that many more ways to look for your dream job. Try it!


Automation is a powerful tool that you can use to free up your time to be dedicated to some of the more critical parts of your job. But did you know that even a simple tool such as screenshot automation has many applications that will help you stay on top of your daily job demands?
###1. Checking your company website

If your job involves publishing content for your company’s website, you probably find yourself checking it often just to get a visitor’s perspective and ensure everything looks right. Instead, set up a scheduled screenshot to take a capture a few times a day and have it delivered to your email and anyone else who might be involved with creating the content on the page.
###2. Checking your company’s social media channels

The social media profiles for your business are your company’s brand image and voice. Checking your profiles to see your follower count or who is engaging with your content across all social media channels can be tedious. And while there are more sophisticated tools for analyzing your social media (such as https://sproutsocial.com), these tools can be costly and may require you to log in to view your metrics. Automated screenshots are a simple and easy way to get at-a-glance insights by monitoring your social pages directly.
Here is a list of just some of the social channels that can be easily monitored with website screenshots:
###3. Monitoring your website’s search engine ranking for certain keywords

You can set up a website screenshot to capture search engine results periodically. This can help you to see what results are performing the best for specific keywords and how you can improve your content to rank higher. Or if you already have a high-ranking result, it can help you know quickly if you begin to trend lower and make changes to regain your position. While Google is the most prominent search engine, Bing and Yahoo still have a large market share. Screen capture all three to gain broader insights.
###4. Scheduled Emailing of a Shared Document or Spreadsheet

Services like dropbox, box, google drive, onedrive, and icloud allow you to easily sync your local documents to a drive in the cloud. They also allow you to share and collaborate on those documents with your coworkers. But what if you have a document that gets updated frequently and you just want to send it to a group of your coworkers periodically? This will allow them to see the updates and changes to the document or report directly in their email without having to proactively keep checking the document directly. It helps eliminate the awkward “well didn’t you check the spreadsheet?” conversations. Instead, broadcast screenshots of the document to them effortlessly. To do this, use the share option in one of the cloud services previously mentioned. Allow anyone with the link to view the document. Copy the link and schedule a screenshot of this link. In Blit, you can add the email addresses of all the people you’d like this document to be sent to.
###5. Competitor Analysis and Monitoring

“If you know the enemy and know yourself, you need not fear the results of a hundred battles.” - Sun Tzu Art of War. Understanding what your competitors are doing in your market is important for making sure your business doesn’t become the next Kodak, Blockbuster, Borders or Toys R Us. Monitoring your competitors’ public presence via website screenshots is a great way to aggregate this information and be updated periodically on what they are doing in the market and how they are innovating. A good place to start would be to set up website screenshots for each of your major competitors on a weekly basis. Here are some of your competitors’ public web properties that can easily be monitored:
Keeping tabs on all of that free and publicly available information about your competitors will help your business to stay relevant and informed. It can help you when making decisions related to marketing, product development, and even on sales calls with a client who might be considering an alternative product or service.
You can start automating parts of your job now with Blit Automated Screenshots.


